Monday, December 21, 2009

Dreaming of a Warm Christmas:
My Square Buttons Are in a New Treasury


Michele of MichelesArtJewelry.etsy.com included my buttons in her beautiful treasury in warm colors.

Follow the link below to see the treasury and the works of included artists:
etsy.com/treasury_list_west.php?room_id=80344

Thank you, Michele!

Saturday, December 19, 2009

New Free Tutorial
Snowflake Cane


New polymer clay tutorial for a snowflake cane is now available on my youtube channel:

Wednesday, December 16, 2009

Custom Order
Completed
Sea Urchin Vases


These polymer clay and pearls vases will be the central pieces at my customer's wedding. They are made as a slightly bigger variation of my Sea Urchin Vase featured in my corresponding tutorial.


My customer is planning to use purple and green as the main colors in her décor, and sea urchins as the main motif – I was told that even her wedding cake is going to be in a sea urchin shape. I am sure it all is going to look wonderful together!


I used the colors and textures of these vases to make small gifts for the bride and her groom. It is a surprise, so I am not showing the pictures of these gifts until my customer receives them.

Tuesday, December 15, 2009

My Poppy Beads in Kate's Treasury


When people create their treasuries on Etsy.com, they create a mini-exhibition. The theme of that exhibition can be a certain color, or a common subject, or, perhaps, the same material used in all pieces in collection. Kate of Organic Odysseys have chosen a different – very nice and gracious – approach to her new treasury. She featured her favorite items of the artists who included Kate's works in their collections earlier this year. What an original and artful way of saying “thank you”!

Follow the link below to see the treasury:
www.etsy.com/treasury_list_west.php?room_id=79372

Kate, thank you for including my poppy beads!

Wednesday, December 09, 2009

The White Orchids Are in One More Treasury


This lovely treasury celebrating beautiful polymer clay works by PCAGOE artists was created by Lynda Moseley (Diva Designs).

Follow this link to visit the shops of all featured artists:
http://www.etsy.com/treasury_list_west.php?room_id=78549

Tuesday, December 08, 2009

My Faux Lampwork Beads Are in a New Treasury


My Polymer Clay Square Tile Faux Lampwork Beads in Earth Tones are included in a yummy treasury by twistedcreatures.etsy.com.

Please follow the link below to see the treasury and visit the shops of all artists, whose works are included in this lovely collection:
http://www.etsy.com/treasury_list.php?room_id=98949

Saturday, December 05, 2009

My New Studio


I want to brag about my new studio!

We have one big semi-finished room in the basement, and I've been using a part of it for my studio. Here is how it looked like a few years ago:


Unfortunately, I do not have a more recent picture – with all the extra stuff I've accumulated since then. The space under this table was packed with boxes, and the table itself was always covered with various unfinished projects.  There were a couple of open shelves overflowing with my tools and supplies, and I also had a smaller, rather inconvenient, table for taking pictures (and you know – I am taking tons of them, both for my tutorials and for my on-line listings).

So, my husband and I finally decided to remodel the downstairs space. Eventually, we'll have three separate rooms there, with one of them being my studio. Since we do all the work ourselves (or to be exact – my husband does most of the work, and I am helping him a little), the entire project is going to take at least a year. Right now, we have one of the corners of that big room enclosed, and we are building a new master bedroom in there.

Suddenly, right before Thanksgiving, my husband scored a VERY good deal on a few kitchen cabinets and counter tops. The best part is that they will fit nicely in the future studio, when we really have it finished, with all the walls and everything. For now, we temporarily installed all the new furniture so that I could use it right away.

Here is where I will be working now:


See the white cube in the corner? That's my permanent photo studio. No more folding and unfolding it between the photo sessions and no more balancing it on a tiny table!


This is my sewing space. Did you know that I actually design and make most of my clothes myself? I still need to put some drapers over the top shelves for now. When we finish this room, all my sewing stuff will be inside a built-in closet.


This part is still open to the rest of the big room. Eventually there will a wall right behind the left section of the counter top.

I am so happy to finally have all these drawers to put away my art supplies. I know, some artists prefer to have their supplies in the open. Not me! I prefer to have only the stuff I am currently working with, and to put it away when I am done.

I took the pictures above yesterday. Here are how the views from my studio look like now (it's been snowing the whole day today):


By the way, the numerous lilac vases are for the custom order I am finishing right now. They are a variation of my Sea Urchin Vase design, and are intended as the central pieces for my customer's wedding.

Sunday, November 29, 2009

My Wedding Orchids are in a Beautiful Treasury


My Elegant Wedding Lariat Necklace with Hand-Sculpted Orchids and Leaves is currently featured in a dreamy Fashion Orchid Etsy Treasury put together by BloomCreations.etsy.com.

You can see the treasury and every item in it by following this link:
http://www.etsy.com/treasury_list.php?room_id=97063

Saturday, November 28, 2009

Eugena's Gift Certificates


I am happy to offer Gift Certificates for Eugena's Creations.  The certificates are available for any money value of your choice and can be purchased at Eugena777.etsy.com.

The certificates are redeemable at any of my on-line shops: Eugena777.etsy.com or 1000markets.com/users/eugenascreations (both are accessible through my main web site, eugenascreations.com). Your gift recipient will be able to choose anything she wants from my polymer clay tutorials, beads, and finished jewelry. The amount of the certificate can be used toward any item or combination of items from my two stores, including the shipping fees.

Your gift certificate will be printed on white card stock paper and mailed to you or directly to the recipient.

Alternatively, the gift certificate can be e-mailed to you (so that you can save on the shipping fees).

Wednesday, November 18, 2009

First Sale


Over weekend, I sold my first piece of jewelry through 1000markets.com.

I am in the process of listing all my jewelry on this site. Right now, some of my polymer clay items are both on 1000markets.com and in my Etsy shop, but as my Etsy listings expire, I am not planning to re-list any jewelry there any more. I am doing quite well on Etsy, but (at least for me) my tutorials and beads sell much better than finished jewelry. This can be explained by a few factors, and one of them, I think, is that in order for my jewelry to be seen by the potential customers, I have to re-new my listings very often. If not re-newed, they drown under numerous more recent listings by other designers. The new site, as far as I understand, has a different algorithm for displaying its content, and I hope my jewelry will have a better chance to be found there.

Wednesday, November 11, 2009

Unbelievable Story
or How the Inspiration Works

A while ago I've got this picture through Etsy conversations.


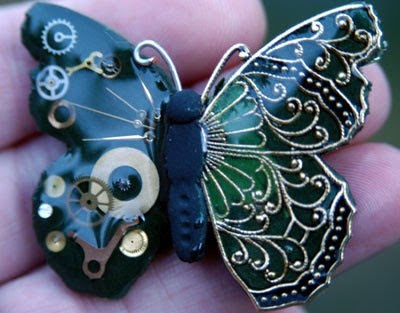
This is a picture of a cake from somebody's blog, which was inspired (get this!) by my steampunk butterflies!

Too bad I do not have the link to the blog itself. If anybody knows where this picture came from, please let me know, OK?

Thursday, November 05, 2009

New Tutorial
Polymer Clay and Fiber
Poppy Beads


The new polymer clay tutorial is available now.

My detailed step-by-step instructions show how to make a beautiful poppy cane, how to shape it into a poppy bead, and how to adorn it with fibers.

This project is simple enough to be enjoyed by a novice clayer, yet fun and innovative enough for those who already have some experience. As always, the skills learned following this tutorial can be used for many various projects in the future.

This tutorial is already listed both in my Etsy shop and on my web site.

Monday, October 26, 2009


My Article in Polymer Cafe

My how-to article was published in a recent issue of Polymer Cafe (December 2009 , Vol. 8, No. 1).

It is a fun project. I show how to make an original vase using polymer clay scraps and left-overs. Rather than covering a glass vase with polymer clay completely, I am leaving a bit of glass exposed. I think it adds interest to the look of the vase.

I hope the magazine readers will enjoy this project.

I love writing for Polymer Cafe. Their editor, Anne Huizenga, is a pleasure to work with – she answers e-mails in a timely manner, and all her instructions are clear and helpful. I am already planning my next article.

Wednesday, October 21, 2009

Student Work
Faux Cloisonne

I received an e-mail from Dora Kollar, who shared with me the results of her first attempt of my Faux Cloisonne technique.


Dora created her own original design, with a graceful shape and beautiful color gradation from purple to black. She has a couple more pictures of this work in progress in her Flickr photo album: http://www.flickr.com/photos/bydk/, as well as pictures of her other polymer clay and beaded jewelry.

Thank you for sharing, Dora!

Tuesday, October 13, 2009

My Faux Cloisonne Workshop
in Baltimore

November 14, 2009

I have finally received a confirmation of my hands-on class scheduled at Baltimore Clayworks studio on November 14, 10am-4pm.

In this class, I will demonstrate my faux cloisonne technique. The picture on the left is the one that was chosen by the studio to represent the possibilities of this style, although I usually advise my students to start with a simpler design.

Cloisonne is an ancient metal-working technique that involves soldering pieces of wire to the metal base and filling them up with glass enamels in various colors.

My faux cloisonne technique allows to get a very similar effect using polymer clay, wire, and resin.

In this workshop, I will demonstrate and then let the participants do the polymer clay part. At the end of the day we will cure all projects in an oven so that they could be easily transported home and finished there later.

In the second part of the class, I will demonstrate how to work with the resin and let everybody practice on some scrap pieces, which I will provide. With this training, the class participants will be able to finish their projects at home. The projects cannot be finished in class, because the resin takes at least a day to cure, and it shall not be disturbed during this time.

I will also provide a detailed review of resins and glazes available on the market, discuss possible errors and ways to prevent or correct them, and demonstrate variations of this technique, including the use of beads, crystals, and metal leaf.

You may find more details about this class and register at http://www.baltimoreclayworks.org/class/mtclasses/fall09/workshops/WS7_workshop.html

Saturday, October 10, 2009

New Tutorial
The Framed Pendants
Is Finished

As promissed, I finished writing the new tutorial, Polymer Clay Pendants with Leaf Imprints and Silver Frames.

The tutorial is currently available through my web site and my Etsy shop.

This is the first time when I am offering the same tutorial in three different versions, with different levels of information provided: in addition to the full version, I also have two shorter ones. Part 1 explains how to make the frame, and Parts 1 and 3 also shows how to attach the frames to the pendants. This turned out a bit different from my original plan, but i think this structure is the most logical and allows my customers to choose the level of instructions they need.

Friday, October 09, 2009

Polymer Clay Calendar 2010


Marjorie Oxman sent me a link to the 13-month calendar she published through lulu.com. The calendar contains full-color picture of beautiful works by 29 polymer clay artists, and is great for inspiration. It would also make a nice gift for polymer clay ethusiasts. I am very happy to see my Steampunk Butterfly included in this amazing collection.

Follow the link below to preview the calendanr and to order your copy. You can save 25% until 10/11/09 by using coupon code FALLFOTO at checkout.

http://www.lulu.com/content/lulustudio-calendar/2010-polymer-clay-calendar/7238894.

Tuesday, October 06, 2009


New Shop
Eugena's Creations
at 1000markets.com

I am in the process of setting my new on-line shop at 1000markets.com.

The idea is to move there all my jewelry, while leaving the tutorials, beads, and polymer clay supplies at Etsy.com.

1000markets offers many ways to manage my products, sorting them into logical collections and controlling the page layout. It is a juried environment, which, I think, will be more suitable for my jewelry. I also like the fact that the products do not need to be constantly renewed in order to be seen by the customers.

I am planning to list most, if not all, of my available polymer clay jewelry by the end of this month. Meanwhile, I am adding new listings every day.

Sunday, October 04, 2009

Exhibition at Baltimore Clayworks

Adornments Adorned, an exhibition focusing on jewelry made with ceramic, polymer clay, or PMC elements, opened yesterday at Baltimore Clayworks.


Here some pictures I took at the exhibition.

The variety of jewelry was great. There were about 30 artists invited to participate (refer to the exhibition web page for the complete list of participants). A few rooms and hallways were filled with jewelry.


I was happy to see many interested visitors.


Surprisingly, there were quite a few gentlemen, who seemed as interested in all this jewelry as the ladies.


Some artists also made it to the opening night. I met glorious Gloria Askin, who presented her new black and white pieces along with her easily-recognizable colorful collection.


All displays were put together by the staff of Baltimore Clayworks, who, I am sure, put a great amount of work into the organization of this event.

Most works by the same artist were presented together. Some were on stands or wall hooks like mine here:

I especially liked this creative presentation of Kate Clawson's (Organic Odyssey) leaf-imprinted pieces.


A few displays were formed with ropes and clothes pins, and I personally was not too impressed by this idea.


I hope the beautiful jewelry pieces on these displays stole all visitor's attention.


Some pieces by the same artist were scattered throughout the exhibition, presented on smaller displays here and there.


The exhibition will continue until November 6, and I hope there will be as many visitors every day as I saw at the opening reception. All works presented at the exhibition are for sale, so I would advise all interested people to get there sooner rather than later.


Here is the address:

Baltimore Clayworks, 5707 Smith Avenue, Baltimore, MD 21209

Thursday, October 01, 2009

Coming Soon
A New Tutorial
Polymer Clay Pendants with Leaf Imprints and Silver Frames


I am working on a new tutorial, which is going to be rather unusual in its format.

One part will explain how to make polymer clay pendants with positive and negative leaf impressions. This is not a new technique, and many people are probably already familiar with it, that is why I decided to separate it from the rest of the tutorial. I want to give people an option of buying the tutorial with and without this part. This part of the tutorial will stand on its own and explain how to make a finished pendant, although without a frame (in case somebody is interested in this technique only).

The second part, however, is rather innovative, because it will explain how to use readily available commercial supplies to make your own flat and custom-shaped frames for polymer clay pendants. I am including instructions for making at least three different shapes of frames, although the possibilities are really endless. I will show how to make smooth and two types of textured frames, as well as how to create a patina finish on these frames. This part will NOT explain how to attach the fames to the pendants - only how to make the frames.  All these techniques can be applied to frame any kind of flat polymer clay pendants (with any design), that is why this second part will also be self-sufficient and may be purchased separately from the first one.

I will also have a more detailed tutorial, with a complete set of instructions for making the pendants shown above.

I am planning to finish the tutorial within about a week. Once finished, it will be available through my web site and my Etsy shop.

Edited on 10/09/09: The main tutorial and its versions will be available today. I decided that the polymer-clay only version (with the explanations of the leaf-impressions techniques) will not be as desirable as an abbreviated version that would explain how to make the frames and how to attach them to the polymer clay pendants. I am in the process of listing all three versions (one full and two shorter ones) on my web site and in my Etsy shop.

The pre-order option is now removed. If you would like to take advantage of this option in the future, please sign up for my newsletter (see the form on the right side of this blog).

Thursday, September 17, 2009

Polymer Clay Exhibition in Baltimore, MD


Baltimore Clayworks is hosting a jewelry exhibition entitled Adornment Adored from October 3rd to November 6th.

Baltimore Clayworks is a ceramic arts organization, which strives to showcase the best to educate and intrigue the public. This new exhibition will showcase the work done with polymer clay, PMC and ceramic components.

The exhibition is intended as a cash-and-carry show, so the customers will be able to purchase the works they like.

I am thrilled to be chosen as one of the participating artists. You may find more information about the exhibition, as well as the complete list of the participants, on Baltimore Clayworks web site.

Wednesday, September 09, 2009

What Is on My Desk
My Son's Science Project

With my love for polymer clay, I think it is quite expectable that my kids very often use this material in their projects. Here is the latest example: my son's science project. Last spring, shortly before they had to start planning their project, I showed him the works of Bird Artist, which he really liked. So, I was not surprised when he asked if he could use some polymer clay to make humming bird feeders for his study.

We have lots of humming birds in our backyard, and usually feed them using a regular store-bought feeder with four red plastic flowers. My son decided to find which color is the most attractive for these birds. He made five feeders: yellow, white, red, blue, and black. I thought it would have been better to vary the intensity of one color, and make white, red, and a three or four pink feeders with different proportions of white and red clay. This way, he could use graphs to present his results. However, he and his teacher decided to go with various colors, so that's what we have now.


First, we made just one test feeder. We replaced our regular one with it to see if the birds would use the new feeder. It looked as if they did not even notice any change.

This weekend, my son made the rest of the feeders, and we placed them around our gazebo. The gazebo has eight sides, and on five of them we placed the feeders. Every day, my son is going to put an exact and equal amount of syrup into each feeder, and then record the amount left in each of them at the end of the day.


Since there is a chance that some feeder locations are more convenient for the humming birds than the others, he is going to vary the position of each feeder every day. Thus, a yellow feeder, for example, will be placed in the first opening of the gazebo on day 1, in the second on day 2, and so forth, until it's been moved through all positions at least a few times. My son wants to run this experiment for a month, but we are afraid that the birds may migrate before the time is over.


It will be interesting to see what he finds out, but I am pretty sure that humming birds do not care what color is behind the hole with their syrup. Once, when we were cleaning and refilling our regular feeder, a humming bird flew to the empty feeder spot (right in front of our kitchen window). She looked quite puzzled by the absence of her food, and tried to get her syrup by sticking her beak first through the feeder hook, and then through these little vent holes we have under the roof. It was very funny! Clearly, neither the hook, nor the vent holes were the color of the feeder, and they definitely did not look like any flowers...

Thursday, September 03, 2009


The Price We Pay


A new anvil - $20.
A hammer - $6.
Some scrap wire – $0.10.
Time spent with my teenager – priceless.


I am writing a new polymer clay tutorial with a wire-working part, so I bought a new and shiny anvil to make some nice-looking pictures. As soon as I take the anvil out of its box, my son comes to the studio. The anvil grabs his attention right away. “O! May I try it?”- he asks, excited. “Sure, honey!”. He grabs the anvil along with a hammer and some scrap wire, and settles on the floor. I almost say something like: “Work gently!” or “Be careful!”, but then remember his continuous fight for independence ever since the school started on Monday, and bite my tongue.

It took him less then two minutes to cover the WHOLE surface of the anvil with nicks and scratches...

Well, hopefully he learned something when I did not yell at him. Or maybe not...

Yet another day of parenthood...

On a positive side: It does not look nearly as bad in the picture as it is in person. I think I can still use it in my tutorial (with a little creative photo-editing, perhaps).

Tuesday, September 01, 2009


New Buttons


I just added these two sets of my new hand-made polymer clay buttons to my Etsy shop.

They are square, with an interesting abstract design in earth tones. I did not use any paints or sealants on them and added some nice texture on their front sides.

I think these buttons would look great on some knitted or crocheted things.

Friday, August 28, 2009


One More Etsy Treasury

Tonja of tonjastreasures.etsy.com created this lovely treasury:


etsy.com/treasury_list_west.php?room_id=66243


Thank you for including my bracelet!

Thursday, August 27, 2009

Turtle-quoise Treasury


My green and turquoise earrings were included in a cute polymer clay treasury by Linda Riopel of NKDesigns.etsy.com:


etsy.com/treasury_list_west.php?room_id=66088


Linda explained her collection by this cute story:

Talking to my 4-year-old granddaughter, I asked her if she knew what color her beautiful dress was - “Of course I do gramma, it's turtle-quoise.”

Saturday, August 22, 2009

...And More Student Work!

I've got another picture from Donna (I wrote about her work earlier this month).

This time, Donna followed my Steampunk Butterfly Tutorial, and this is the pendant she made. She says, the she showed this pendant on her www.mosaicandstainedglass.org mosaic site, facebook, and flickr, and was very pleasantly surprised by the amount of comments that she received. Donna was kind enough to provide a link to my tutorial, and I really appreciate it.


On a side note: my kids are back after spending two months with their grandparents, and while I missed them a lot, I have to admit that now the amount of my free time dropped down catastrophically...
Related Posts with Thumbnails